Are you new to planners or just want a little boost when it comes to utilizing your favorite planner (or planners if you're a hoarder like me!)? I'm super excited to be joining my girl-crush Marcy Penner in her new Studio Calico class, Planner Bootcamp! This class isn't about fussing up your planner with stickers and such - nope... This class is all about HOW to make your planner work for you!
I'm so excited to share my newest class, Day by Day | Mix It Up, with you today! This class is all about my process for creating Project Life mini albums and books!! If you've been wanting to get started with mini albums, or just want to learn some new and unique ways to create your books, I hope you will join me!!
I'll be putting together a 4x4 mini album in this class stuffed full of photos, extras, interactive bits and more!! I love mini albums and this 4x4 size is my very favorite! It's an easy size to start and finish, and you can use 4x6 or 4x4 photos, which is always a plus for me!!
I'll be using the class kit + a few extras for my album and I hear the kit is selling fast, so add it to your cart if you are interested!
Here's a little bit about the class from the Studio Calico site:
DAY BY DAY | MIX IT UP
Looking for a way to refresh your everyday memory keeping? Stephanie Bryan inspires you to think outside your normal way of documenting by showing how she records her year using a variety of albums! From how she selects each album to the cool techniques she uses inside, you’ll get to see her entire process for putting together stylish books that document all of those favorite everyday moments.
Bundle and save! Purchase all four of our 2016 Day by Day Workshops with one click!To find out more about the Day by Day Workshop Bundle,click here.
This workshop is enrolling through May 1st at 3:00pm EST and content will be available starting April 15th
I'm super excited to be a contributor at Studio Calico this month! This month's kits, Film Club, do not disappoint and I had so much fun cutting, pasting and creating with the Documenter and Planner kits!
I wanted to incorporate a bunch of photos on one page (collages are my favorite), so I printed out a contact sheet of 2x2 photos and trimmed my journaling cards down to 2x2 as well! Can't wait to show you this finished page!
And here's a sneak peek at April in my planner! The stamp this month is a fun one!! I'm not the best about stamping on my layouts and Project Life spreads, but my planner sees a lot of stamps!
If there's one thing I learned about Project Life, it was to mix things up and change things around. Today, I thought I would share one of my very favorite Project Life spreads in hopes to inspire you with your album this year! If you haven't tried out a square-sized pocket page yet (meaning the pockets are all uniform and squared), I highly recommend picking up a pack or even making your own using either your sewing machine or fuse tool!
There is something so fun about square photos and journaling cards. And since most of my images are square now a days thanks to Instagram, printing off photos is super easy!
For this spread, I started by printing about 12-14 images. I knew I wanted to use a few journaling cards and filler cards in the pockets, so I didn't need a photo for every pocket.
I started by slipping my photos into the pockets, leaving a few spaces for trimmed journaling cards. I tried to balance the photos on each side of the page and make sure the journaling cards were spaced among the photos.
For the middle pocket of this page, I trimmed down a journaling card to more of a rectangle and then stapled it into place in the pocket. I like to have a little bit of transparency and see-through in my albums and using cards/photos smaller than the actual pocket is an easy way to achieve that effect. Stapling it to the pocket keeps it from moving around and possibly slipping out!
I kept my embellishments rather simple and let the photos speak for themselves. My motto is definitely less is more right now.
Have you ever tried out a square pocket for your Project Life album? Go give it a shot! If you love Instagram or collages like me, I bet you will love your new pretty page!
I know it's late in the "resolution" game, but I really want to try some new things this year. Something I have really wanted to do for a while is make MORE VIDEOS. I love making videos. I love creating, so why not combine the two! And....I am determined to get myself in front of the camera, as you will see in this new (and incredibly awkward) video today! Ideally, I would love to have you all over to craft together in my studio, but for now, I will have to settle on videos and pretend talking to people. So for 2016, my goal is 52 new videos just for you! One video a week for every week of 2016! I'm a few weeks behind the game, but I'm going to try my best to catch up and stick to my goal!
Come hang out with me for a while today as I walk you through setting up my January planner! (And I also uploaded a few older videos to my YouTube channel, so come subscribe and follow along!)
Thanks so much for stopping by and I hope you join me on this video adventure! If there's anything that you want to see or any particular project you'd love for me to create, just leave me a comment here and I will definitely add it to the list!! Happy crafting (and recording)!!
One of my favorite ways to create a scrapbook page is to use all of my leftover scraps and extra photos together. I've always gravitated toward a white background, so I tend to have lots of "scrap" papers leftover. And I print more photos than I know what to do with, so combining the two turns out to be a win-win for me!
When I'm pulling my extra supplies out to create a page, and I have a lot of elements I want to include on a page (photos, papers, etc...), I love to pull out my circle punch and go to town.
Circles are so versatile and add such a fun element to any project! Sometimes I layer them together with other round embellishments, and other times, I crave a little more uniformity on my page.
For this page, I used various papers and photos punched from circles and left part of a row empty to add in my title. You just gotta love circles and you can't beat using your extra supplies to create a page!!
What's your favorite way to use up those scraps and extra photos??
I sat down this weekend and looked back through all of the projects I've created this year. I didn't create as many layouts as I did in years past since a lot of my creative time was spent on my Project Life albums and a few other projects, but I seriously love every single one from this year.
Grids were a common design point for a lot of my layouts. I love using grids with papers, photos and embellishments. They are so versatile and so easy to manipulate! I love adding in alpha or letters in my grids, and from looking back through my favorites, I obviously really loved spelling out my titles in a "mixed-up" grid design!
I've mostly been working on my December Daily album, so I haven't created a layout in quite some time and I'm on the fence about continuing to document our memories through layouts. I've noticed that my actual layouts have become more "photo-focused" and less "story-focused", so I'm doing a little soul searching over the next few weeks to decide how I want to continue telling our story.
What about you? Do you go back and forth about creating layouts and/or other projects??
I keep coming back to a grid design. I think it's because it's just easy to do, but can vary so much with different sized photos, papers, embellishments, etc...
For this layout, I started with a 4x6 photo of my son and then built the grid around the photo. It's fun to cut and paste and really create without any set parameters.
This page came together SO easily, which just reaffirms my love for a grid or collage.
I broke up the papers and patterns a little by adding in a leaf embellishment from the Studio Calico Canyonland Scrapbook main kit and also added in a little wood veneer alpha for texture along the bottom strip of paper. I've said it a zillion times before, but it's the simple embellishments that add so much impact to me!
When I started this project in January, I wasn't really sure if I would make it all year. It's not a "difficult" project per se, but it does take time and effort to print, organize, document, etc. Sadly, memory keeping is an easy to project to move down your ever growing to-do list, right? Laundry, activities, homework all seem to take center stage. But I'm committed and really determined to finish up this year strong. Looking back through my books, I've noticed that the more recent books have become all about the words and photos (which I'm totally ok with). The beginning of the year includes more creative ideas and processes (like vellum photos, pockets, creative journaling).
I don't think there is a "right or wrong" when it comes to memory keeping. I find, for me, that I like to print my photos and get them into place and then go from there with journaling and extras. Usually, by the time I've printed, I'm already running out of steam so adding in lots of extras hasn't been in the cards the last few months!
This month, I went with a 4x6 sized album that I had in my stash. Using up my supplies has been awesome. I've used more products, printed more photos and written more words this year than in years past with the 12x12 Project Life size.
And here you can see a little walk through of my album! Hope you enjoy it!!
I went out on a limb this month with my Project Life spread over at Studio Calico and decided to give the 12x12 size a go again! I was surprised at how easily the spread came together and really do love this size (I just wish the darn albums weren't so large and bulky).
I found myself following my normal "process" which consisted of printing out all of my photos first, adding in a few filler cards in the extra spaces and then including my journaling. So fast and so easy!
I think one of the things I always struggled with with this size was having the two pages have a good flow and coordinate well with one another. Using a kit, like the Wink Wink Project Life kit from Studio Calico this month, really helps make that process easier!
The cards and accents were designed to compliment each other, so it's easy to pull in elements and have a good flow/feel on the page.
I used my typewriter to add most of journaling onto either my photos or journaling cards. Typing on photos still is my absolute favorite! I love leaving a little bit of "negative space" when printing out my photos so I can add in my thoughts!
For this photo of my two kids, I was worried the sun and trees in the background would make my typing difficult to see, so I typed onto a piece of white printer paper and then stitched the strips into place! I love how the words pop from the photo!
The 12x12 size really is such a fun size to work with! And pairing the design A page protectors with a coordinated kit makes the process even easier! That's a win-win in my book!
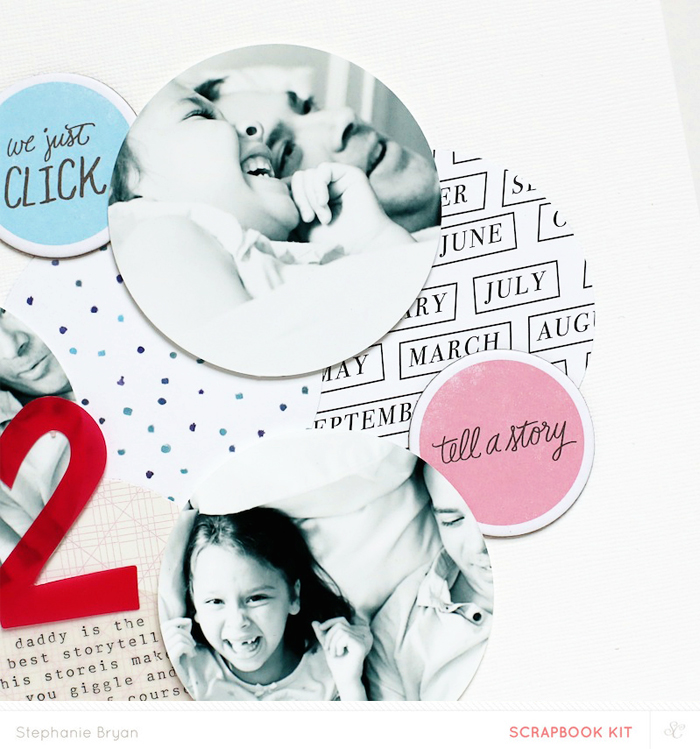
I love using various shapes on my projects and circles are by far my favorite!! When I saw the chipboard circles in the Wink Wink Scrapbook kit, I knew I wanted to play around with them to create a page of round circles, punched paper circles and the chipboard elements!
I began the page by layering the paper circles on my background and then my photos. I moved them around a little to get a good balance of patterns and text. Then I added in the chipboard pieces, some journaling typed onto vellum and an acetate "2".
Pages like this really are so simple to create, but since they are little different than the typical "square photos" and square corners, they seem a little more complex and involved!
So what about you?? Do you love using circles on your pages? If you've never stepped out of the "square" box, you just have to try them out! Grab your favorite circle punch and get crafty!
I'm a little late to this party, but here are my sneaks for this month's kits at Studio Calico. This month's kits are called Wink Wink and they are super fun and playful. They pair saturated citrine tones with neutral colors for a surprising twist!
I still have a few more projects in mind for these fun kits, and thankfully a few more days until reveal. The months (and weeks) just seem to go by so quickly now that school is back in and everyone has a zillion things to do!!
As the year has gone, I've worried each month about being able to try something fun and new with this project. That was pretty much my main goal for starting this monthly albums this past January. I was kind of tired with the normal 12x12 Project Life pages, but still wanted to document our days and our memories.
I love creating mini albums, so it was pretty much an easy decision when it came to creating albums every month. And every month I stress about the size and how to do something "new", and then every month I fall in love with a different sized/type of album.
This month, I chose to use a Travelers Notebook for our memory keeping. I have a few of these pretties, but mainly have used them for lists, notes, etc. I hadn't merged the two yet. Now I am SO glad I did.
The Travelers Notebook is the perfect little "album" for creating a mini album. The base pages are white and clean and are already bound together (and super score that you can create your own inserts and pages).
I'm over on the Studio Calico blog today sharing a look at our September in the Travelers Notebook. This month is by far my favorite. I love how compact and simple this album - how the photos take the center stage and really pop from those white pages.
In this month's video, I talk about some of my different tips and tricks for working with the Travelers Notebook, so be sure to check it out!! Thanks so much for letting me share these monthly albums with you! As the year comes to a close, I'm just so grateful that I have these books and all of these memories recorded.