slider

Showing posts with label my mind's eye. Show all posts

7/31/14

My Mind's Eye: Insta-Days Mini Album


I have a new mini album tutorial up on the My Mind's Eye blog today.  It's full of "insta-goodness"!  Here's a peek at my finished book, but stop on by the MME blog to see a simple tutorial!


6/30/14

My Mind's Eye: Birthday Daybook


Happy Monday!!
I'm over on the My Mind's Eye blog today sharing my monthly mini album tutorial!  This month I'm giving you a step-by-step tutorial for creating a daybook!  I'm not sure why I haven't made a zillion of these, because they sure are awesome!  Here's a few little peeks at my book!  Stop by the My Mind's Eye for the full tutorial and to see more!!


6/9/14

My Mind's Eye: Inspiration Folder

Are you a collector of pretty pictures, magazine clippings and mailers too?  I always find myself pulling out my favorite ads and pictures, but never really know what to do with them!  As I was shuffling through some of the things I've been saving, I decided it would be awesome to have a folder to keep them all together and easily accessible!  Using the new Market Street collections and Essentials collections from My Mind's Eye, I put together a little inspiration folder and I have to say that it's pretty awesome!


It's kind of like a Pinterest board I can touch and hold.  I'm a very tactile person, so having something in person is so much better than viewing it on a computer screen.


The inspiration folder is created from two of the frameable art pieces from the Market Street collections.  I have a full tutorial up on the My Mind's Eye blog that shows you step-by-step directions!!  


It's the perfect folder for keeping those "I just can't throw this away, but I have no idea what to do with it" pieces of life.  You could easily adapt this to create a travel journal, mini album or art journal!  So many possibilities!!

4/30/14

My Mind's Eye: April Mini Album


My husband and I recently celebrated our seventh wedding anniversary with an overnight getaway.  It was so nice spending some time together and I of course had to document this occasion.  As I was looking through all of the amazing My Mind's Eye collections, the overlays from the Record It! "Here is Happy" Journaling pack popped right out at me and I knew they would be fabulous in a mini album.  I didn't have too many photos from our little trip, so the overlays added a nice visual effect to my book.  Putting this book together is super fast and easy since there is very little trimming or cutting involved!

Let's get started!


1. Start by gathering your supplies.
I am using the overlays from the Record It! "Here is Happy" collection, as well as some journaling cards and 6x6 paper pad from the Record It! "Just Splendid" collection.  I love how versatile the MME products are!  You will also need a hole punch, two pieces of 4x6 chipboard and two book rings.


I printed off five photos from our trip and then paired them with 5 overlays and 5 journaling cards.  I wanted to keep consistency throughout my album, so each spread will be:  journaling card - overlay - photo.  I also grabbed an extra overlay to use as a cover/title for my mini album.  


2. Add your title onto an overlay.
I chose to use the chevron overlay as my cover page and adhered my title "seven" and a wood veneer onto the front.


3. Adhere a 4x6 piece of patterned paper to each piece of your trimmed chipboard.
These two covered pieces will be the front and back of your book.  I trimmed a piece of patterned paper from the "Just Splendid" paper pad to 4x6 for my cover page and used a 4x6 journaling card as my end page.  

**Tip: Save the chipboard that comes in paper packages just for book binding and covers.  The chipboard adds some stability and thickness to the book.**


4. Add your journaling and embellishments and adhere your pages back to back in the journaling - overlay - photo order.


4. Punch holes in your photos, overlays and journaling cards.
Now that your pages are adhered together (with the overlay between the journaling card and photos), you will want to punch two holes on the left hand side of your book.  Be sure each adhered page and overlay is facing in the correct direction to make sure you don't add your hole to the wrong side.

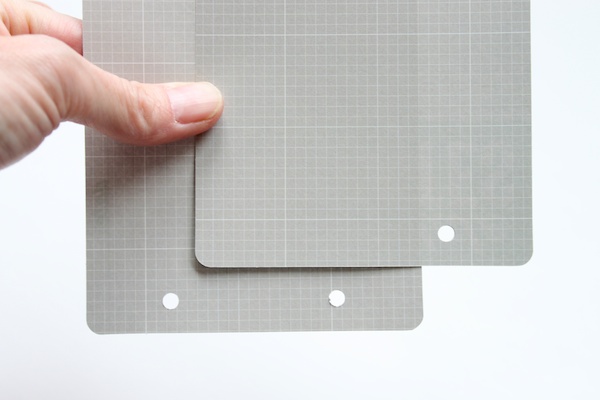
**Tip:  To get your holes perfectly centered, grab two 4x6 cards and punch a hole on one side.  Then flip your top card over and punch the second hole, using the first hole as your guide.  This will guarantee your holes will be equal distance from the edges.  See photo above for a better visual.**


5. Add your book rings and you are all finished!!

Here's a look at my finished book...


I love the transparent effect of the overlays.  They add so much interest to the photos!!

Thanks so much for joining me today!!  I hope I have inspired you to create a mini album using these awesome overlays!!  Let me know if you have any questions!  Can't wait to see what you create!


4/3/14

My Mind's Eye: March Mini Album


I had a new mini album up at My Mind's Eye this week!  It's a simple accordion album using journaling cards and wood veneer cards!  You can check out the full tutorial here


2/28/14

my mind's eye: february mini album


i'm on the my mind's eye blog today sharing my monthly mini album tutorial.  and yes...i'm still slightly obsessed with mini albums!  :) 
just.can't.stop.

hope you like it!!


happy friday!
xoxo


2/26/14

CREATE magazine & My Mind's Eye

Scrapbook Generation and My Mind's Eye teamed up last month to bring you Issue 2 of CREATE magazine.  It's full of sketches, inspiration and beauty.  I am honored to have two of my projects featured in the magazine.  

Grab a cup of coffee and enjoy.  You can find the full issue at Scrapbook Generation.  


1/31/14

1/2/14

this week in blog land...

i put together a "2013 in review" album using one of the new starter kit albums from my minds eye.  you can see the full tutorial, as well as how to create a simple photo collage on the mme blog.


the january gallery at write.click.scrapbook is now live!!  this month is all about "the times" and for my layout, i decided to reflect on these moments that are too fast and too fleeting.  i kept my layout pretty simple with some sewn crepe paper, a doily and a few embellishments.  take a look....


and since it's january, the new design team gallery is up at gossamer blue too!  i used the awesome january kits to get caught up with my project life album!  i only have a little bit of journaling left to do on weeks 52 and 52.5 and that book is all finished!


if you are looking for a new challenge, the january mood board at jot magazine is up and running!  it's winter here, but in australia, it's the middle of their summer!  this month's challenge includes beautiful beach colors and pretty summer pictures!  totally makes me long for warm weather and my bathing suit!! 


11/1/13

hello november...

november is here and there is so much goodness to share with you today!!

first up….


issue 3 of jot magazine is now available for viewing.  it's beyond amazing.  it's full of christmas goodness!!!

i contributed a few projects for the magazine and i'm so excited to see them in print!  here's a little peek of my projects!!  you can see more pictures and details in the magazine!!


moving on….


i decided to write some of my dreams for my children down on paper.  i typed them onto vellum and layered them on top of that beautiful floral paper from crate paper


i am also on the my mind's eye blog today sharing the november challenge.  here's a peek at my layout!!  stop by the mme blog for more pictures and to play along!


hope you are having an awesome day!
thanks so much for stopping by!!  

xoxo