slider

Showing posts with label challenges. Show all posts

1/2/15

Project Challenge 2015


I have always been a big fan of the new year.  To me, the new year means a time for new beginnings, fresh starts and fun challenges.  I always start the new year with some type of project in mind.  Last year, I decided to start documenting 12 on the 12th where I take twelve photos on the 12th of each month.  I loved this project, and especially love every single photo that I took this past year.  This challenge really made me look at our everyday lives...the daily stuff...the mundane....the craziness.  The photos I took weren't necessarily "stellar" family photos, but they captured our here and now like no other.  The project itself made me stop and look at our everyday; it made me stop and appreciate all that we have in our lives.  But it was a loooooong project.  And I realized that while I like projects, I really like being able to complete a project (in a timely fashion) and move on to something else.  I'm not necessarily ditching the 12 on the 12th, but will likely do a mini version of it....maybe quarterly rather than monthly.

For 2015, I am tackling a BUNCH of projects.  I want to learn a few new things, try out some things on my to-do list, get creative, and most of all....just have fun.  I had originally thought about doing one project each month, but some are easy and some are more challenging.  I don't want to feel guilty if something takes me longer than a month; and I don't want to feel like I have to wait to start a new project.  One of my 2015 goals (in general) is to be a little easier on myself.  Sometimes I like to "box myself" into timelines and constraints for no reason at all.  The end result is usually anxiety and guilt.....two things that I would prefer NOT to have as a part of my new year!

I would LOOOOOVE to have you all join in with me for ANY or ALL of these projects! 

Here are the projects I'm hoping to tackle in 2015.

1. Make bracelets.  I really love this wrap around bracelets.  They seem rather easy to make and I'm hoping to make a whole bunch this year!!
2. Knit a blanket.  Knitting a blanket has always been on my "to-do" list.  I've started several, but never actually finished them.  This time, I'm going with chunky yarn and big needles.  Hopefully this won't be a big fail!!
3. Crochet mini animals.  I don't know how to crochet, but I plan to teach myself this year!  My husband bought me this crochet kit for Christmas and it has a bunch of patterns for this cute little animals that my kids are dying to have.  So.....I guess I gotta make them, right???
4. Black & white photography challenge.  I always love black and white photography.  I'm thinking about maybe documenting one month in black & white.  Doesn't that sound so fun?
5. Quilt.  Yep.  I'm going to try to quilt.  I can't sew a straight line to save my life, so this should be interesting.  I'm a good paper sewer....not so much a fabric sewer.  Hoping my mother-in-law will help me out on this one!
6. Film photography.  I really want to take a few rolls of film photography just as an experiment.  Elise does a similar project and I love how magical her photos are!!  I don't have a 35mm camera, but I'm on the hunt for one!!
7. Another weaving.  I only managed one weaving project this year, and it was a little tedious, but I'm all for trying another one.  Plus, Anna wants one for her room, so I said I would try.  (Sucker...)
8. Embroidery.  I've never tried embroidery, but I bought this cute little kit last year, but never got around to doing it.  Adding it to my list this year. 
9. Letters to my children.  Carly over at Lily and Twig has this series, Letters to my Daughters, that I have been a big fan of for a while.  I wanted to start last year, but I never did.  I tried to do a "Little Talks" series here on this blog, but that never took off either.  (Sounds like a failure waiting to happen, right???).  But...I think this is so important and I really want to try to make it happen.  I think I got too caught up in "making a page" rather than writing a letter.  Planning to keep this one simple and sweet.  

I'm sure I'll add more throughout the year!  I'm all about trying new things!!  What about you??  Are any of these on your list???  What projects do you have planned for 2015??

8/11/14

Challenge: Get out those Paints!


Hello friends!!  Happy Monday!! I have a new process video, as well as a new challenge for you today!!  As you will hear in my video, I've been in a little creative slump for the past few weeks, so I decided to play around with my paints and create a simple, but soft page using some of my favorite colors.  The video and process itself are nothing earth shattering by any means, but I really don't think this hobby or craft SHOULD be a difficult concept or challenging task.  If you've followed along with me or watched any of my videos, you've probably noticed that my pages are never really super complicated or complex.  I like to use layers, colors and texture to make my pages visually appealing (to my eye), but how my pages come together is a pretty simple process.  I usually don't realize this until I make a process video, but I love watching how others pages come together, so hopefully someone out there enjoys my simple process!!

So.... here's a look at my page and the video follows below!!  I hope you like it and I so hope you will play along with this new challenge!!  It's pretty simple: get out those paints and add them to your page!  Easy peasy!  Be sure to link up your projects at the bottom of this post!!


Man I love those colors, don't you???  I was so close to splattering my craft room walls with these colors after I finished filming the video!  


And a great big THANK YOU to all of the lovely ladies who played along with my last challenge!!  It's always so amazing to see your projects and how my challenge inspired you!!  You all inspire me to keep creating and creating and I can't thank you enough!!  Let's take a peek at those awesome projects!


7/1/14

Challenge: Creating a Vertical Band


Creating a vertical band on your layout is a great way to bring movement and flow to your page.  You can use a column of embellishments, a patterned paper background or multiple photos to create this effect.

I love to add a vertical layer of patterned paper on my backgrounds.  Since I tend to gravitate towards a white background, the patterned paper can add a pop of color and little texture on my page.  For my layout above, I started by trimming a piece of paper to about 3.5-4 inches wide by 12 inches tall.  Following the rules of thirds, I layered my paper roughly on the right third of my background.  Next I added in a few more paper layers and die cuts to create depth and dimension.  These die cuts from Kim Stewart at Studio Calico are my new favorite.  I love all the intricate details and movement they create.  

Tip: I usually staple my die cuts to my patterned papers so I can move them a little rather than adhere them flat to my page.


I like to layer embellishments on top of my die cuts to help draw your eye to their delicacy.  And as you can see in the photo above, I often overlap the die cuts onto my photo.  I think it helps ground my image and my page.


To balance out the left hand side of my page, I created a small cluster of embellishments using tags, ribbons, a resin flower and a die cut.  It's simple, but effective in balancing out the weight of my page.


I would love to see your take on the vertical band!  You can use patterned paper, embellishments, photos, words, etc!  It's totally up to you!

And thank you so much to Maria and Anita who played along with my last challenge!!  You girls are awesome and I just love your projects!!


5/30/14

Challenge: Embellishment Clusters


Thank you so much to those of you who played along with last month's challenge!!  I love love love each and every layout and am just so grateful that you all joined in with me!!  I am always amazed at all the different interpretations of a challenge!  You guys are awesome!


I have a new challenge for you all today if you would like to play along!  I was super inspired by the lovely Maggie Holmes and her recent post sharing some tips for adding embellishments to a layout.  You will likely always see some type of cluster of embellishment on my pages and projects.  There is just something about adding in a few pretties that finish off a page to me.  

Here is my page for this challenge:

For my layout, I started with my photo and a few of my favorite embellishments from the Styleboard collection.  I like to use a good mix of light and dark colors when I'm creating clusters.  I think the warmer, darker colors, like the brown and cork, help ground my page and keep my photo from getting lost in my background.


As you can see, I always like to layer my clusters to give them a little movement and dimension on my page.  Layering helps keep the cluster from being too large or too distracting.


For my background, I sewed a few strips of Styleboard patterned paper to the top part of my page to create a base for my photo.  I randomly trimmed my papers at various lengths and widths and layered them over one another for a messier look.


I also created a little tag cluster at the bottom of my page to help balance the heavy portion at the top. I kept it small and simple, but I think it's pretty effective.  

And that's it!! I can't wait to see your take on this challenge!  Link your projects up here when you are finished so I can see them all!!  You can also tag me on Instagram!!  

Happy creating!

4/23/14

Jumpstart 4 with Marcy Penner

So, you all know that I love challenges, right?
Well, I couldn't pass up Marcy Penner's latest Jumpstart this week!  I frequently have the desire to create something (like every.single.day), and her challenge was perfect because a) I needed to clean up my desk and b) I already had a photo printed and ready to go.  Printing photos often gets in my way of "making stuff".  I've contemplated getting the Epson Picturemate for some time now, but haven't quite taken that leap yet.  

Here is my "clean off your desk" layout!  

I used Maggie Holmes' Styleboard collection for this page.  I had lots of bits and pieces scattered all over my desk from a project I had just finished and I knew it would good perfectly with my photo.  I started by building a paper layer base onto my background. I love paper layers and actually wonder why I don't do this method more often.  I love how you can see little bits of the patterned papers and colors, but that it's not too overwhelming or distracting from my photo.  My typical layering pattern consists of neutral-bold pattern-neutral-photo.  Using smaller scraps of paper in this combo created such a fun and playful background, I think!!

All of the embellishments were on my desk, as well and I just grabbed and placed...trying not to overthink their placement!

And that's it! My Jumpstart layout all finished and ready to be placed in an album (or maybe just placed on top of my ever-growing piles of layouts).


4/21/14

Challenge: Using a Large Title


Thank you so much to those who played along with my last Recipe Challenge!!  Recipe challenges are my favorite!  They are easy, fun and take all of the "guesswork" about what to use out of the equation!

Check out all of the lovely projects.  I love how everyone has a different take on the recipe even though the same types of products are used!!  

(Listed from left to right)


My next challenge for you is to use a large title on your project.  My layout below all came about because of the three words "Yes You Can".  I hear these words in Pure Barre all of the time and they usually resonate with me all day long.  One day when I was feeling crafty, I thought about allllll the other things I should be doing (think: laundry, cleaning, planning dinner).  My kids were in preschool and my husband was out of town.  I had the house all to myself and all I really wanted to do was create (which is all I really ever want to do).  So I thought to myself "yes you can"...and so I did!  :)

I started by cutting out my title from a few of my favorite patterned papers and then grabbed out a few photos and embellishments.  I wanted my title to be the statement of my page, with the photos more of an afterthought.  Usually my photos speak the majority of my story, but today, these words are what I wanted to convey on paper.  

I used two "crafty" photos that I had in my photo box.  Really anything could have gone here....so I just used what I had available.  A few simple embellishments, some journaling and my page was done!

Here's a look at my finished page:


Super simple page, but the words speak volumes to me.  I have this page sitting up on my desk to remind me that the little things can wait....  :)

What about you??  Can you think of a title that resonates with you or your life right now??  If you are up for a challenge, I would love for you to play along!!  Anything goes....just as long as you use a large title!  Get creative and have fun!

Please link up your projects here and tag me on Instagram .  
There isn't really a "deadline" per se....just link up when you can!!  Can't wait to see what you create!

Happy crafting!  

4/6/14

A Recipe Challenge


I love challenges!  I love having a starting point or some type of direction when I have new supplies or photos to play with.  I'm always thinking of different techniques to try or fun ways to put my photos to paper!  It keeps it exciting and interesting!  And my very favorite part of challenges is sharing them with you and having you all play along with me!!  A great big thank you to Anita and Julia for playing along with my last challenge and linking up your layouts!!  Check out their awesome layouts below!!  If you have time, click on over to their gallery page and leave them some love!!


Since it's Sunday and I have an itch to create, I decided to create a little recipe challenge as my starting point.  I love knowing exactly what to use on my page.  Now all I need to do is move paper around and get creative!  Even if I'm not playing along with a challenge, I will still make a recipe for myself.  Sometimes lots of pretty supplies can become overwhelming for me!  Narrowing down what I want to use keeps it light and fun....just the way it should be!


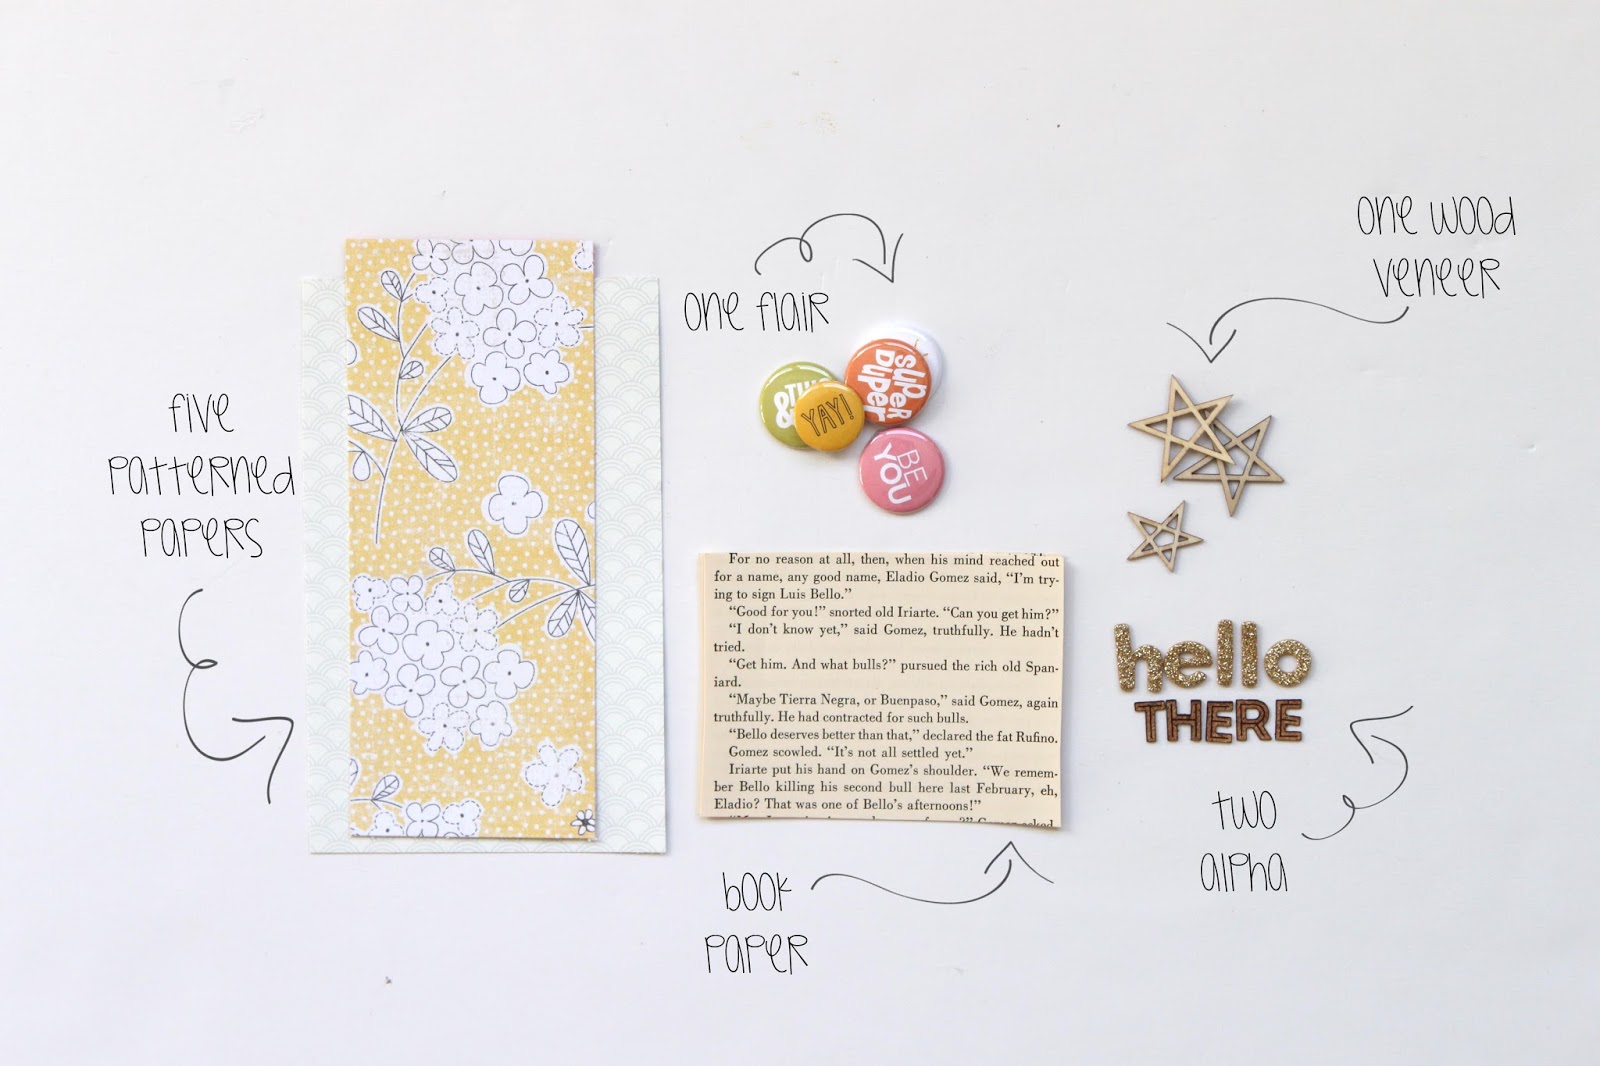
Here's the recipe for this challenge:
Five patterned papers
Two photos (not pictured above)
Two different alphas
One flair
One wood veneer
Book paper

Here is my take on this challenge....  I was really feeling circles today, so I went with it.  Circles are so fun and easy to play with and can be quite eye catching.  I used a small and large circle punch for my patterned papers and photos and then just played around with layering them.  I added in the book paper too for a little bit of contrast.  I had a harder time with the alpha since I wanted my title to fit inside of one of the circles.  In the end, I used the Studio Calico Cork Alpha stickers and some smaller Basic Grey for my title.  


And that's it!  Grab your photos and supplies and get crafty!!  I hope you will play along!  Challenges are always more fun with friends!  Be sure to link up your layout here in the comments section so I can see your work and feature your layout!!  And if you happen to be on Instagram, you can tag me there (@stephaniebryan).  Can't wait to see what you create!!

3/17/14

Using large photos & a challenge


The kids were snuggled in on the couch this weekend watching Frozen for the zillionth time, so I snuck away for a few moments in my craft room.  I love to create, but printing pictures is my least favorite thing.  I do have a little box where I keep extra photos that haven't been used yet, but I flip through those so often I'm kinda tired of seeing them.  As I was looking for something to use on a project, I found two photos of me with my kids that I had printed on a piece of white card stock.  The photos were a little bit larger than I would normally use, so it was fun to play around with paper and photos in a different way.

I challenged myself to create two layouts...one for my daughter and one for my son using these two photos.  I used the Office Hour Scrapbook kit and Project Life kit from Studio Calico to put these together.  The least amount of options, the better for me.  I can sometimes get lost in paper and embellishments if I'm not careful! :)


I thought it would be fun to offer this up as a little challenge with a fun prize on my blog today!  I'd love to see your take on this project!

It's super simple to do and you really only need a printer and some paper to make it happen!

Here's a quick little walk through....
Start by printing two photos onto a piece of 8.5x11 white card stock.  I used Aperture to print my photos by choosing the "two photos per page" option.  Play around with your printer settings and try to get two large photos on one page.  If you would like to Photoshop to layer your photos, I put together a little template for you to use.


After you have your photos printed onto one page, just cut right down the middle for two large photos.  Now it's the fun part!  Get those photos and stories onto a layout!

Here's my two layouts!


I used some papers from the Office Hours Scrapbook kit to create a base for my photo.    I sewed my photo onto a piece of printer paper so I could add my journaling under the photo.  I filled in the bottom part of my photo with this awesome cut file created by Paige Evans.  A few embellishments, cork stickers and a trimmed journaling card finished off my page.


For this photo, I started with a vertical band of papers on the right side of my white background.  To keep it girly, I added a large white doily and a few stamped flowers inspired by this tutorial from Elizabeth Kartchner.  I also sewed a glassine bag underneath my photo so I could add my journaling onto a Project Life card and slip it into the bag.


So are you up for a challenge??  I'd love if you would play along!  After you post your project to your blog or gallery, add a link in the comments here!!  This challenge is open until next Monday, March 24th.  I'll post the winner to my blog and send out a fun little goodie bag!

Happy Monday and Happy St. Patrick's Day!!
xoxoxo